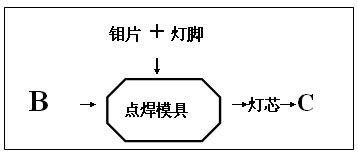
Process 2. Take over 2.1 to cut the exhaust pipe. The glass tube is placed in the automatic chat mechanism 2.2 flame to melt one end of the glass tube, flare. production process: 2. Filament manufacturing 1.1 Filament staff classify tungsten wire inspection, determine the diameter of tungsten wire, and clean it with electrolytic solution. production process: III . wick manufacturing 1.1 Put the molybdenum sheet, lamp foot and filament into the spot welding mold 1.2 Adjust the position of the three materials, gently step on the spot welding machine to make the welding head weld the spot weld to 1.3 spot welder to inspect the first piece. Products, to ensure that the wick solder joints are firm, no oxidation, no deformation. production process: IV. 1.1 Lamp for producing a pinch seal or robotic hand wick and bulb. 2. Exhaust 2.1 Manual or robot automatically lifts the clamped semi-finished product to the exhaust station and locks the 2.2 exhauster to vacuum and detect the lamp. The vacuum is not turned off when the vacuum reaches the set value. Unloading 2.3 The vacuum reaches the required lamp and is flushed into the N2 rinse. production process: 3. Old refining 3.1 set the voltage of the old vending machine according to the requirements 3.2 manual or machine automatic feeding old light bulb, sub-check light and non-lighting lights 3.3 aging staff is responsible for verifying the quality of the first product 4. The high pressure 4.1 old refining foam needs to be stored in the high pressure tank for more than 8 hours. production process: Five . Assembly (H series) 2. Focus 2.1 Put the light piece into the feeding mechanism, manually or machine automatically adjust the position of the light piece 2.2 Insert the lighted lamp head into the light piece 2.3 Machine through the camera system Auto focus 2.4 Lamp and the lamp piece are welded together 2.5 machine The table is printed on the lamp. 2.6 The employee is responsible for the inspection of the first product and the adjustment of the equipment. 3. Soldering leads 3.1 Solder the leads on the lamp legs that require leads (eg H3) VI. Package 1.1 1.2 Finished appearance inspection 100% inspection of the product quality of 1.3 packaging packaged light sampling, qualified release production process: Seven . Others (PAR, MR series) Editor: China Lighting Network Leaves Audible and visual alarm is set up to meet customers' special requirements for alarm loudness and installation location. At the same time, two alarm signals, sound and light, are issued. Special fields: iron and steel metallurgy, telecommunication towers, hoisting machinery, construction machinery, ports, transportation, wind power generation, ocean-going ships and other industries; it is an accessory product in the industrial alarm system. emergency alarm,Audible Visual Signals,Visual Alarm devices,sound and light siren,visual alarm system Taixing Minsheng Electronic Co.,Ltd. , https://www.ms-speakers.com
First, the blister manufacturing 1 saw tube 1.1 saw glass tube 1.1.1 adjust the position of the positioning block 1.1.2 flat push the glass tube to the saw on the grinding wheel 1.1.3 saw tube staff to measure the size of the first product 1.1.4 saw tube Employees full inspection saw tube appearance quality 1.1.5 inspection regular inspection saw tube length 1.1.6 water cleaning saw glass tube 1.1.7 clean glass tube into the furnace drying 1.2 saw exhaust pipe 1.2.1 adjusted Saw pipe positioning 1.2.2 Flattening the long exhaust pipe to the machine table saw 1.2.3 Saw pipe staff self-inspection saw pipe length and appearance quality
2.3 After the soft exhaust pipe is burned, the 2.4 closed bulb is cooled, and the blister of the leaking gas is automatically inspected. 2.5 The exhaust pipe burr is taken. 2.6 The employee checks the first piece and is responsible for the adjustment of the equipment. 2.7 Inspector Regularly check the length of the bubble. Connect the bubble coaxiality. 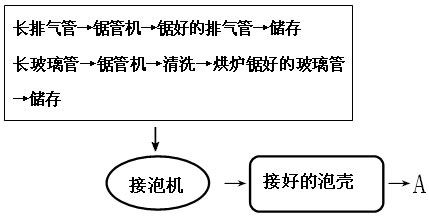
1.2 The diameter of the molybdenum wire used for the wire is classified, and the molybdenum wire matched with the tungsten wire is selected and annealed.
1.3 Winding tungsten wire and molybdenum wire, using chemical agent to remove oil, and then shaping the wound filament 1.4 to re-wind the shaped filament, chemically remove oil, and then wet hydrogen stereotype.
1.5 After the shaping, the filament is cut into a filament of the required length on the cutting machine, and sent to a hydrogen-sintering annealing furnace. The 1.6 is chemically oxidized to remove the molybdenum wire in the tungsten wire. The filament after the filament is cleaned and stored for inspection. 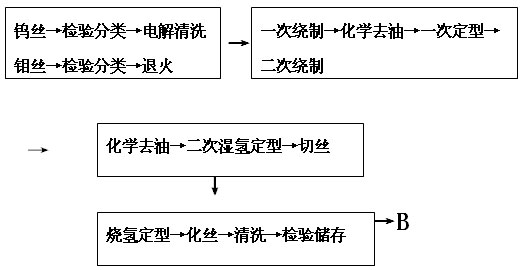
1.2 access protection N2
1.3 The flame burns the bulb and forms a hermetic seal with the molybdenum sheet of the wick. 1.4 After cooling, it is automatically cut to the assembly line. 1.5 The seal is responsible for the first part inspection and equipment adjustment.
1.6 The inspector regularly checks the compressive strength of the splint, the length of the bulb, and the center of the light.
2.4 flush into the H2 point hydrogen 2.5 flame flooding blister degassing 2.6 flushed into N2 rinse 2 times.
2.7 Check the vacuum degree before flushing the halogen gas, and flush the halogen lamp to the lamp that reaches the set value.
2.8 The halogen lamp is immersed in nitrogen and cooled.
2.9 Exhaust staff is responsible for the detection of the first product. 2.10 Inspectors regularly check the pressure of the gas. 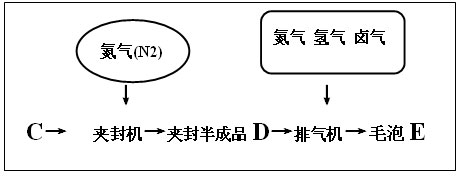
4.2 Lamps after high-voltage storage are lighted for inspection, and the lamps that are leaking, not bright, and unqualified are removed. 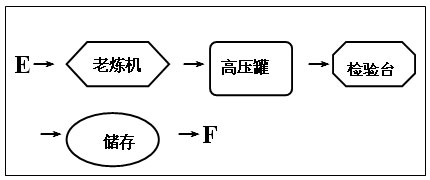
1. Assembling 1.1 Put the lamp cap and foam into the automatic feeding mechanism 1.2 Manually or machine automatically adjust the position of the lamp head 1.3 Manually or machine automatically insert the hair running into the lamp holder 1.4 The foamed molybdenum foot and the lamp cap are welded together 1.5 Light the hair bulb, Inspection welding quality 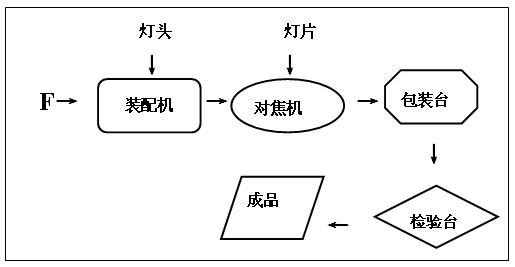
For PAR, the MR series of lamps are different in assembly from the H-series lamps.
MR series:
Cupping → Printing → Injection → Drying → Capping → Inspection → Packaging PAR Series:
GU10 buckle cap → cupping → pressing needle → capping → printing → inspection → packaging E14 cupping → heading → soldering → printing → inspection → packaging 