Non Contact & Quickly Measurement: 1S fast temperature measurement within 2-4 inches. Non-contact infrared measurement, while avoiding cross infection. No need to hold, can be hung / double-sided adhesive tape / bracket fixed.
℃/℉ Switchable Easily & Accurate Readings: ℃ and ℉ of this Infrared thermometer for humans are easily switchable. Pressing the button to switch it. An advanced infrared sensor chip with a tested 100,000 operating lifespan rapidly delivers accurate and precise temperature readings. is designed for people of all ages, including infants, children, adults, and seniors.
Alarm Function: A green light will indicate that their temperature is within a normal range, and a flashing red light and audible alarm will indicate that the person has a high temperature when the temperature is over high>37.5℃ or 99.5 ℉.
Widely Used: High-definition display, Wall-Mounted Body Thermometer can be stationed in offices, supermarkets, shops, restaurants, apartments, hotels, train stations, community centers, and building entrances. Can be connected to USB power, charging treasure
Wall Mounted Infrared Thermometer,Wall Mounted Forehead Thermometer,Auto Thermometer,Non Contact Wall Mount Thermometer,Wall Mount Thermometer Axiswell Technology Co., Ltd , https://www.medhealthycare.com
Steps: 1. Prepare a network cable to connect the smart TV with the computer.
2. Open the smart TV, press the Home button (house key) on the remote control to enter the smart system, and then move the cursor to the system settings icon, and click the confirmation button on the remote control to enter (as shown below) 
3. Move the cursor to the system information text and click OK to enter (as shown below) 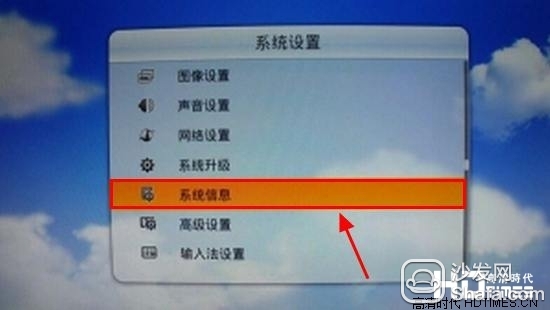
4. Check whether the software version of the smart TV is V8-0MT3202-LF1V075_000. If it is not this version, please perform the system upgrade operation first. If it is already this version, skip the following steps and proceed directly from step 11 (as shown below ) 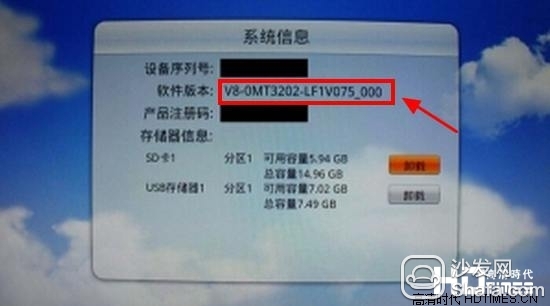
5. If the software version is not V8-0MT3202-LF1V075_000, press the back button on the remote control to exit this interface, then move the cursor to the system upgrade text and click OK to enter.
6. Insert a USB flash drive into the USB port of the TV (make sure the USB flash drive has more than 1GB of free space), and then select the download upgrade package (as shown below) 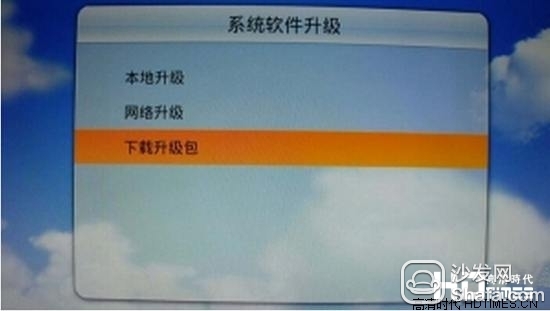
7. The system prompts to find the new upgrade file, click the Download Now button to download the upgrade package (as shown below) 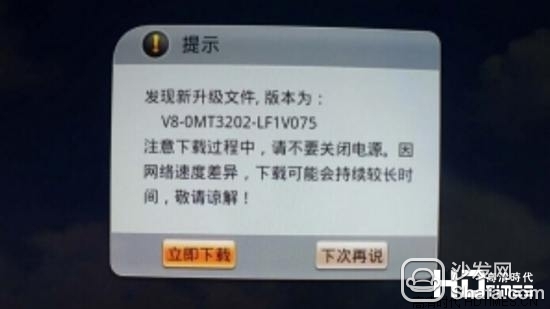
8. After the download is complete, move the cursor to the local upgrade text, press the confirmation button, the system will pop up the upgrade prompt, click the confirm button again to upgrade the system (as shown below) 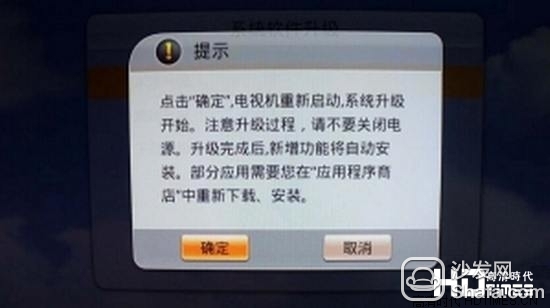
9. At this time, the TV automatically restarts and enters the upgrade interface. The upgrade process lasts for approximately 3-5 minutes. During the upgrade process, do not power off. After the upgrade is complete, the TV will automatically restart (as shown below). 
10. After upgrading, enter the system information to view the software version. At this time, it should be V8-0MT3202-LF1V075_000.
11. Enter system setup options again and select network settings.
12. Continue to select the wired network settings after entering (as shown below) 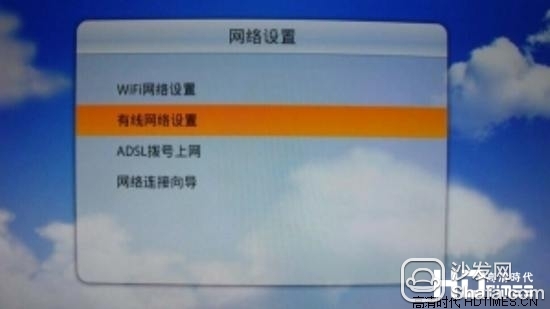
13. Continue to choose to manually set the IP address after entering (as shown below) 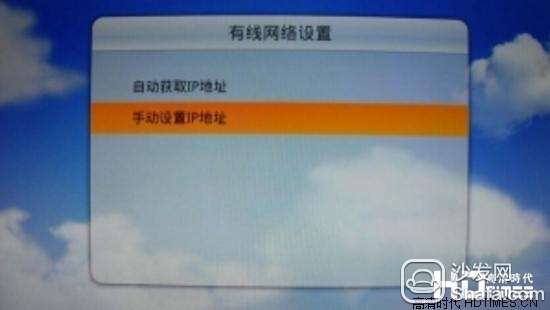
14. In the popup window, enter the data such as IP address and subnet mask, and then press OK to confirm. (As shown below) 
15. Configure the computer's IP address to ensure that the computer and the TV's IP address are on the same network segment (eg, the TV is 192.168.0.10, the computer is 92.168.0.20) and the subnet mask is the same (eg, 255.255.255.0).
16. Open the CMD and PING the IP address of the TV to ensure that the network is connected.
17. Unzip the attached adb archive, double-click on the linker .bat, enter the TV's IP address in the program, and press Enter to connect.
18. After installing the Flash Genie software, open the software. The software will automatically connect to the TV. After the connection is successful, the following interface will pop up (as shown below) 
19. At this time, the TV will automatically install the wizard assistant program and automatically pop up the following interface on the TV (as shown below) 
20. If the TV has a black screen at this time, please press the Home button on the remote control and then press the menu button to restore the main screen, then click the wizard assistant icon to re-enter the program (see below) 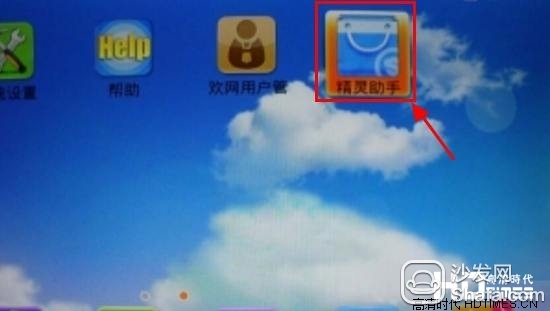
21. Select Utility Options on the Brush Genie Software on the Computer (see below) 
22. Select Root crack and follow the prompts (below) 
23. After the Root is complete, the TV returns to the main interface and observes whether the authorization management icon appears on the main interface. This icon indicates that the TV has Root success. If this icon does not appear, please perform step 22 Root crack again ( As shown below) 
24. At this point, the Root step has been completed.
Many users like ROOT in order to obtain higher authority, but some users do not know how to ROOT, it is easy TOOT bad. Xiao Bian teaches you how to use TCL Smart TV ROOT, and conveniently downloads ROOT tools.