Abstract: The following applicaTIon note shows simple circuits using the DS1814 MicroMonitor. Circuits include interfacing with an 8051 microprocessor, interfacing with a PIC microcontroller, and using an LED to indicate reset.
IntroducTIon to the DS1814 MicroMonitorThe DS1814 micromonitor features Vcc level monitoring, a manual reset pushbutton, and an internal watchdog TImer. With three different pin-outs, the DS1814 will work with most circuits requiring microprocessor monitoring, and has great funcTIonality for its size. The DS1814 is available in SOT-23-5 and FlipChip packages.
The DS1814 has a 5% and 10% voltage monitoring tolerance. This tolerance level is used to determine when the micromonitor activates and releases reset conditions on a power-up and power-down. When Vcc drops below the set tolerance level, the DS1814 initiates a reset condition to allow the microprocessor enough time to properly take care of its peripheral devices and shutdown itself. When Vcc rises above the power trip point, the micromonitor holds the microprocessor in reset for a minimum of 140ms to give the microprocessor's peripheral devices enough time to start-up before the microprocessor attempts to communicate with them. This tolerance level also determines when the micromonitor considers it is safe to release the microprocessor from reset. On power-up, the power-on reset is active, keeping the microprocessor from activating . Once Vcc reaches the tolerance level set by the micromonitor, the reset condition stays active for a minimum of 140ms. This guarantees that the processor w ill only attempt to communicate with its peripheral devices once they have completed their power-up. Once the power-on reset time has expired, and the voltage is still at or above the voltage tolerance level, the micromonitor will release the reset condition and allow the microprocessor to run.
Another way the micromonitor controls when a microprocessor resets is through a manual reset pushbutton input. The DS1814A and DS1814C have a pin dedicated to an internally debounced pushbutton reset. Since the input is internally debounced, there is no need for any external circuitry to debounce the pushbutton reset signal. When the micromonitor is not in a reset condition, it monitors the voltage on the pushbutton reset pin to see if it drops below 0.3Vcc. If this occurs, the micromontior puts the microprocessor into a reset state. This reset state is maintained until the pushbutton reset pin is brought above 0.8Vcc. The reset will remain active for a minimum of 140ms, typically 200ms, after which the reset will be released and the microprocessor will be allowed to run.
The DS1814 can also control the activation of a microprocessor by monitoring an internal watchdog timer. The strobe input is monitored for a transition from high to low. This low strobe must occur once every 1.12s. It is a good idea to pulse the watchdog pin more often than once every 1.12s to verify that the watchdog timer is being reset so that the DS1814 doesn't mistakenly reset the microprocessor. If a transition is detected on the strobe input pin, the watchdog timer in the micromonitor is reset and begins counting again. If the micromonitor does not detect a voltage transition on the strobe input pin within the timeout period, the reset becomes active for a minimum of 140ms. Once this time has elapsed, the DS1814 will release the reset condition. The DS1814's watchdog timer performs an important function by offering redundancy for the microprocessor's internal watchdog timer. If the microprocessor's internal watchdog timer is disabled, the DS1814 will still look for a transition on its strobe input pin. It is possible to use a microprocessor signal, like ALE on the 8051, to strobe the DS1814's watchdog input. The disadvantage with this option is that even if the code goes into the weeds, ALE may still toggle which defeats the purpose of using it to strobe the watchdog input. A preferred method of monitoring the stability of a microprocessor is to toggle a port pin tied to the micromonitor's strobe input pin. While this method does require a port pin, it is the most reliable method of updating the micromonitor's watchdog timer. If the watchdog timer is not needed, float the signal to the strobe input to disable it. DS1814 Example CircuitsThis section will show some circuit examples to give better understanding of the DS1814 applications. The DS1814 has three pin- out options. The microprocessor used in the application determines which pin-out should be used. Now that the basic functions of the DS1814 have been explained, its time to look at some simple circuit e xamples to get a feel for how to use the micromonitor. First consider the kind of reset the microprocessor has, active high or active low reset. If the microprocessor has an active low reset, any of the DS1814 micromonitors may be selected. If the microprocessor requires an active high reset, the DS1814B or C should be used. If a manual reset is required, the DS1814A or C should be selected. Finally, if a watchdog is necessary for a design, the DS1814A or B both have an internal watchdog timer . One of the three DS1814 pin-out options should provide proper functionality for any circuit design.
Table 1. DS1814 Functionality by Part Number
| Device | Active-Low RST | RST | Active-Low PBRST | Active-low ST |
| DS1814A | X | | X | X |
| DS1814B | X | X | | X |
| DS1814C | X | X | X | |
The circuit in Figure 1 shows how to connect the DS1814A to an active low microprocessor. The PIC16F84A was chosen because it has an active low reset pin and has port pins available to toggle the strobe input pin of the DS1814A. In the circuit in Figure 1 , the DS1814A has its active-low RST tied directly to the active-low MCLR pin of the PIC. The Master Clear (Reset) (actve-low MCLR) pin's voltage level determines whether or not the microprocessor is in reset. The PIC's application software is responsible for toggling the strobe pin once every 1.12s. As long as the PIC transitions the voltage on this pin once every 1.12s, the micromonitor's internal watchdog timer will not timeout. If the watchdog timer does timeout, then pin 1 of the DS1814A will be pulled low and the PIC will be placed in a reset condition for 140ms. An option for this circuit is to add a pushbutton to manually reset the PIC. This is done by connecting a normally-open pushbutton or switch between pin 3 of the DS1814A and GND. No debouncing circuitry is required. If pin 3 of the DS1814A is held low for 500ns, then the micromonitor knows that the manual reset has been activated and it goes into a reset condition for a minimum of 140ms. Another good idea is to add decoupling capacitors to the voltage source pins of both the DS1814 and the microprocessor. This helps to prevent voltage spikes due to large, instantaneous drops in Vcc. Also, placing the decoupling capacitors as close as possible to the device, as well as keeping PCB traces short reduces voltage spikes.
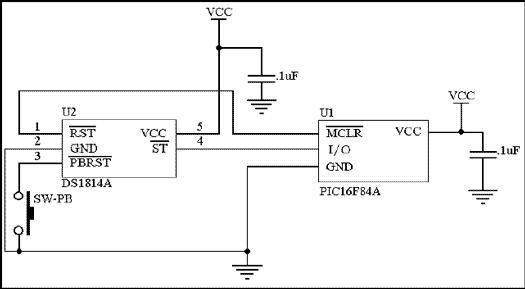
Figure 1. Application of the DS1814A connect to a PIC microprocessor.
The DS1814B offers the flexibility of being able to use both an active high and active low reset at the cost of the manual reset pushbutton option. The DS1814B also has the ability to monitor the watchdog signal sent from a microprocessor. Figure 2 shows an example of how the DS1814B connects to a PIC microprocessor.
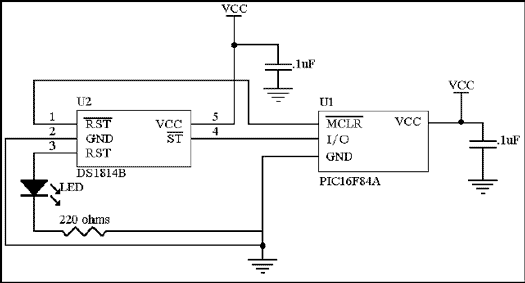
Figure 2. Application of the DS1814B connected to a PIC microprocessor.
Notice that the active low reset of the DS1814 is connected directly to the Master Clear pin of the PIC. Also, one of the PIC's I / O pins is used to transition the voltage on the DS1814B's strobe input pin. Usually, if a manual reset is not required or another microprocessor requiring an active high reset is not in the circuit design, pin 3 would be left open. However, as shown in Figure 2, an LED tied to ground through a 220Ω resistor is used to indicate when the DS1814B is in a reset state. This added circuitry is just an option, but it is useful to have a visual cue of when the device is in reset.
Another option is to use the DS1814B to monitor a microprocessor with an active high reset, like an 8051 (refer to Figure 3).
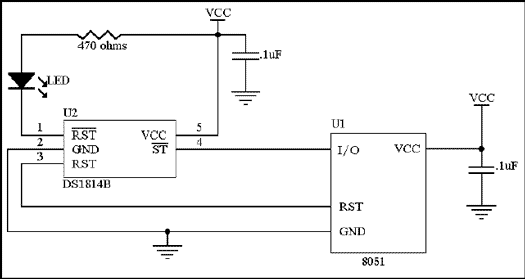
Figure 3. Application of the DS1814B connected to an 8051 microprocessor.
The DS1814B's active high reset is connected directly to the 8051's reset pin and one of the port pins from the microprocessor is tied to the strobe input pin of the micromonitor. The difference here is that the active low reset, which would otherwise be disconnected, is tied to Vcc through a 470Ω resistor and an LED. This is used to indicate when the device is in a reset condition.
The last two circuits make use of the DS1814C (refer to Figures 4 and 5). This device has an active high reset, an active low reset, and a manual reset. This micromonitor would be useful when the microprocessor's internal watchdog is going to be used, or when the watchdog isn't going to be used at all. The first circuit shows how to connect to a microprocessor with an active low reset, and the second circuit shows how to connect to a microprocessor with an active high reset.
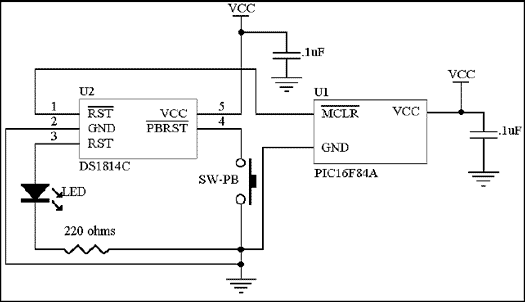
Figure 4. Application of the DS1814C connected to a PIC microprocessor.
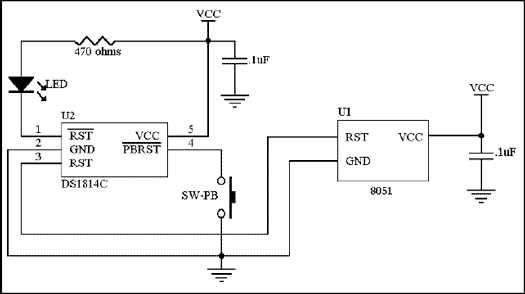
Figure 5. Application of the DS1814C connected to an 8051 microprocessor.
Both of the above circuits are similar to those circuits presented before, with the exception that there is no watchdog timer option. Instead, the internally debounced pushbutton is used to control resets. The optional LED reset indicators are also shown. ConclusionAll of the circuits shown are easy to implement. Even if just the reset pins of the DS1814 are connected to a microprocessor, the micromonitor has the ability to safely control the power-up and power-down of a microprocessor and it peripheral devices. The DS1814 is a very useful in keeping a microprocessor circuit stable.
Five Burner with Built in Hob
5 Burner Gas Hob,5 Burner Gas Cooker,5 Burner Hob,Glass Gas Hobs
xunda science&technology group co.ltd , https://www.gasstove.be